
#SAP Discovery Service
One of the most basic problems in deploying an enterprise app which end-users acquire through a public app store is getting your organization’s server connection & configuration settings to the app when it’s installed, without forcing your end-users to jump through hoops. You may use a heavier solution like Mobile Device Management, but this requires maintaining application configurations in both your MDM system and Mobile Server, or integrating between the two. You might use a simple email onboarding approach that uses launch links to open the app and inject the connection settings, but this is inherently insecure, and wide-open to phishing attacks. I’ve seen some cool solutions using QR codes that are displayed on an intranet mobile onboarding website, but this requires the end user to be logged-in to the network in order to get up and running.
SAP has supported the MDM solution in prior versions of the Mobile SDK, with SAP Afaria. It will continue to do so, but I’m pleased to announce the launch of the SAP Discovery Service cloud solution, which allows you to publish app connection settings for end users on your email domain/sub-domains, using just their email address.
At a high level, the process is as follows:
- Register with SAP Mobile Secure, receive onboarding email
- Activate your Discovery Service provider ID
- Update your DNS system with a TXT record that SAP can access with advanced DNS query, to verify you are the owner of the domains/subdomains for which you’ll publish app configurations
- Activate the domains with Discovery Service, for your provider ID
- Publish your app configurations to Discovery Service, for your provider ID & domain
- End users are prompted for their email address when they launch an app for the first time. The app makes a request to Discovery Service, which does a lookup for configurations for the domain + application ID.
- If the configurations are available, the application uses them to attempt to register to the SMP/HANA Cloud Platform, Mobile Services endpoints
##How-To Video
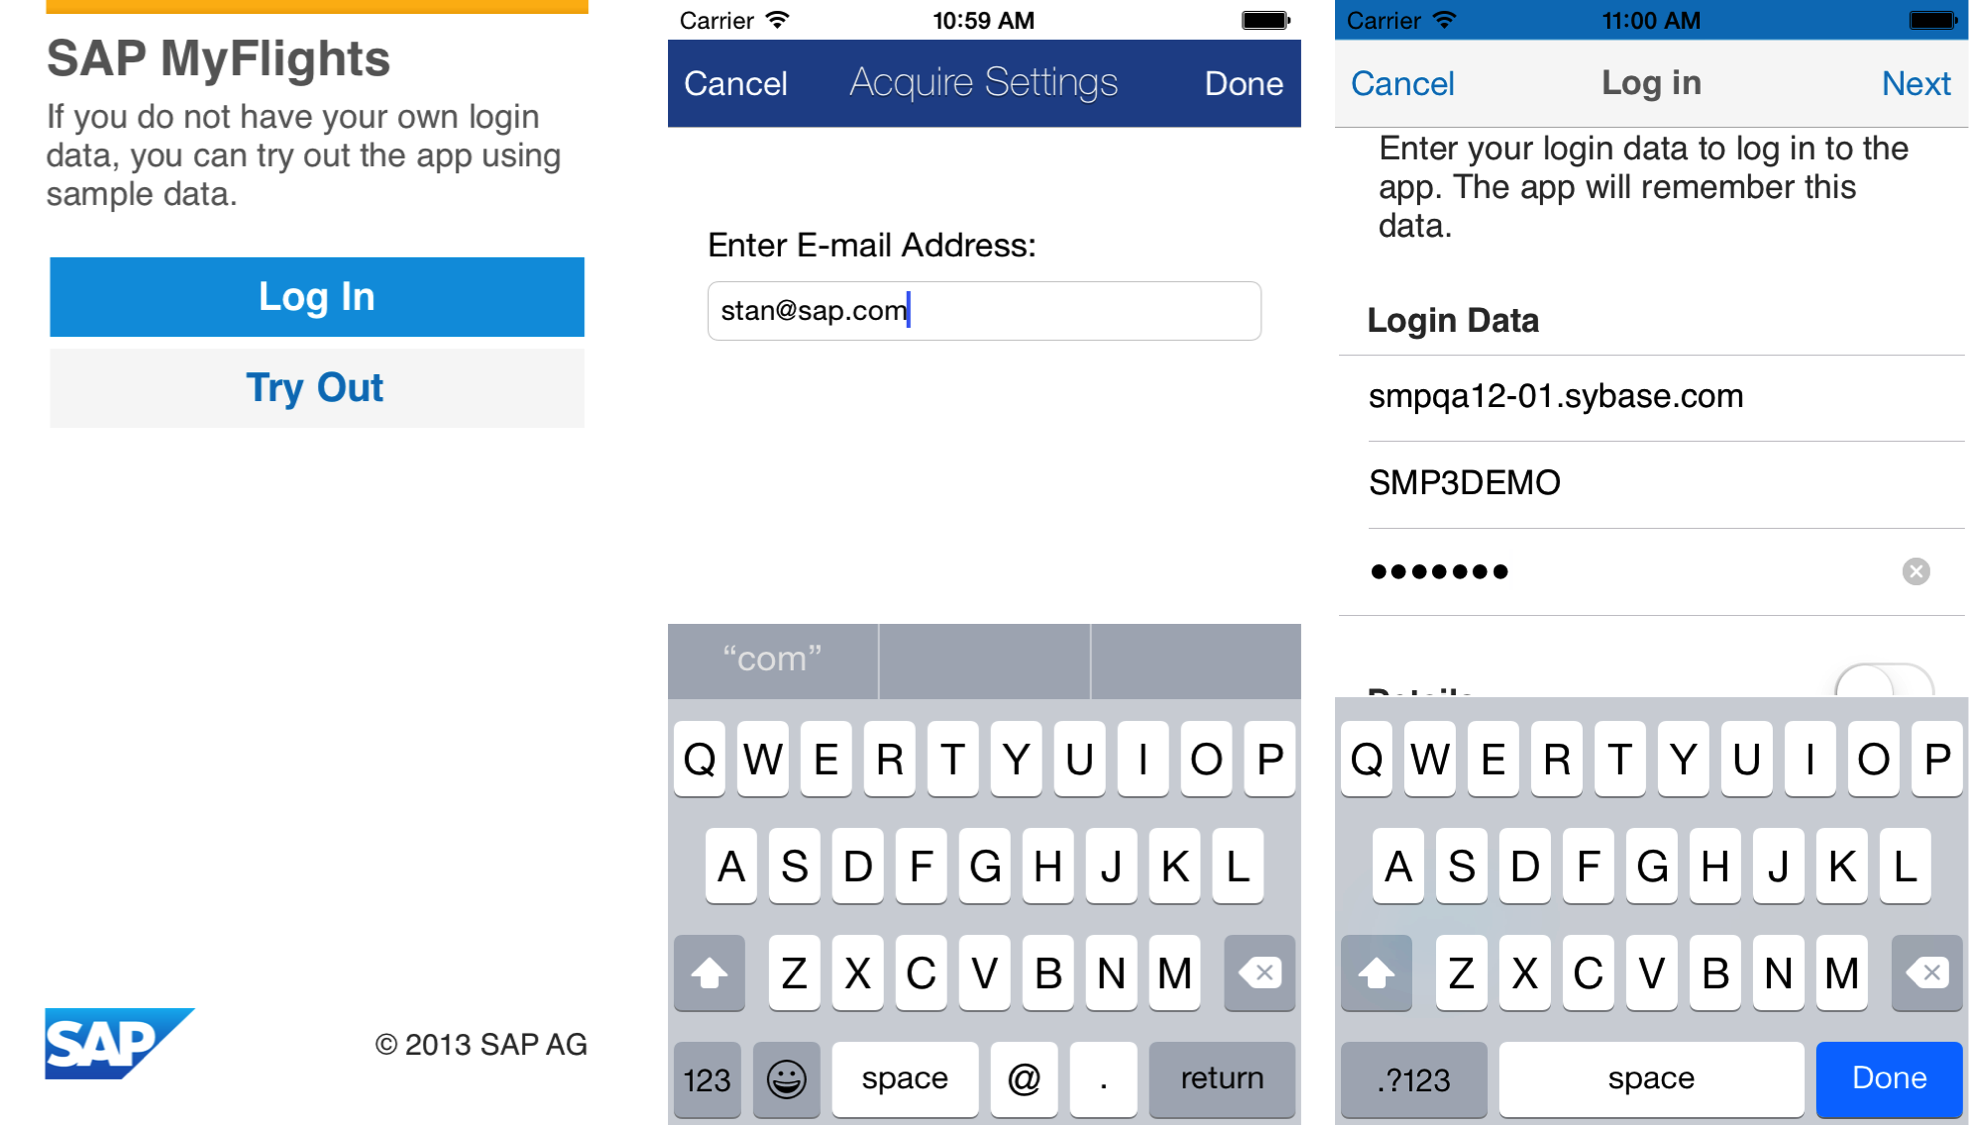
##End User Experience The end user experience is quite simple. When using the regular Logon component in your app, the end users may see your splash screen (1), and/or launch directly to the ‘Acquire Settings’ screen (2). There, the end user is prompted for an email address on their corporate domain. On entry, the client fetches the connection settings for that ApplicationID + Version + Domain combination.
If the app requires the end user’s Basic credentials, the end user is prompted for credentials, and the acquired settings are pre-populated on the Login screen (3).
If the app uses SAML2 or Client Certificate authentication, the Login screen is not displayed, and instead, the SAML2 authentication challenge is handled in a webview. If the app uses Client Certificate authentication, the Login screen is displayed, with the pre-populated connection settings, and end-users should click ‘Login’ to continue.
The Splash Screen may be disabled, by editing the plist property in MAFLogonUING.bundle/MAFLogonUIOptions.plist: set
keyMAFLogonUseSplashScreen = NO.
This is a one-time operation, and connection settings are persisted for the lifetime of the app. End users can re-acquire connection settings by resetting the app, or un-registering (if supported in the app).
##Adding Discovery Service to your app as a Developer The Discovery Service UI is baked-in to the Logon component and flow, so there is very little additional work required to include it in your project.
Important: Discovery Service features in the SDK are typically notated as
Mobile Place. So, MobilePlace == Discovery Service in the libraries and bundle names. ‘Mobile Place’ is actually a product codename for SAP Mobile Secure, which is the team managing the SAP Discovery Service deployment.
-
Make sure that Logon component is added to your project, along with the required bundles
The typical set of bundles to add to your project includes:
MAFUIComponents.bundle HttpConvAuthFlows.bundle Logger.bundle MAFLogonManagerNG.bundle MAFLogonUI.bundle Settings.bundle MobilePlace.bundle -
Add MobilePlace.storyboard, from MobilePlace.bundle
A detail in the way xCode reads linked resources requires you to explicitly add MobilePlace_iPhone.storyboard to your project. (This file works for iPad as well.).
In your xCode Project Explorer, explode MobilePlace.bundle > Base.lproj, and then drag MobilePlace_iPhone.storyboard up into the project itself. It will appear side-by-side with the bundles.

-
Ensure that MAFLogonUING is set to show Discovery Service UI
Verify that the key value in MAFLogonUING.bundle/MAFLogonUIOptions.plist: is set to
keyMAFLogonUseMobilePlace = YES. -
Optional: Disable configuration check by MAFLogonManagerNG to SAP Afaria MDM client
SAP has supported distributing configurations and client certificates natively between the Logon component and SAP Afaria, and continues to do so in SAP Mobile SDK 3 SP05. However, if the applications are configured to get configurations from Afaria, and fail to find configurations from Afaria, then they will not fall-back to try the Discovery Service. So, if you are distributing your application through a public app store, be aware that you should either:
a) Caution customers who have already deployed SAP Afaria, that they should distribute configurations via SAP Afaria
b) (recommended): Disable SAP Afaria feature on MAFLogonManagerNG, by setting key value
keyMAFUseAfaria = NOin MAFLogonManagerNG.bundle/MAFLogonManagerOptions.plist. Then, have your customers upload their application connection configurations to Discovery Service. If your customers are also using SAP Afaria for distibuting client certificates, then you can enable them to continue to do so by implementing the<CertificateProvider>protocol in your application, so that the provider invokes the Afaria APIs for obtaining the client certificate. In this way, the Discovery Service will be used to obtain the configurations, and the ClientCertificate protocol will be called by Logon, and the client certificate will be supplied by Afaria.Note: It is possible for customers to adopt option (b) on net-new applications, but still support their existing configuration landscape with SAP Afaria for apps already deployed to app stores & end users.
-
Build and run. The ‘Acquire Settings’ screen should appear, and you will be able to see the request and response from the Discovery Service in the console
2014-08-15 TravelAgency_RKT[] URL: https://discovery.sapmobilesecure.com/config-api.svc/ApplicationConfigurations/getApplicationConfiguration(AppConfigID='flight:1.0',EmailAddress='stan@sap.com')

2014-08-15 TravelAgency_RKT[] received response: { "host" : "smpqa12-01.sybase.com", "port" : 80, "protocol" : "http"}
##Upserting Application Configurations to Discovery Service Upserting configurations to Discovery Service can be done natively from the Admin UI of HANA Cloud Platform Mobile Service (‘HANA Mobile’), or directly, via the REST API.
###Common to HANA Mobile and REST API
-
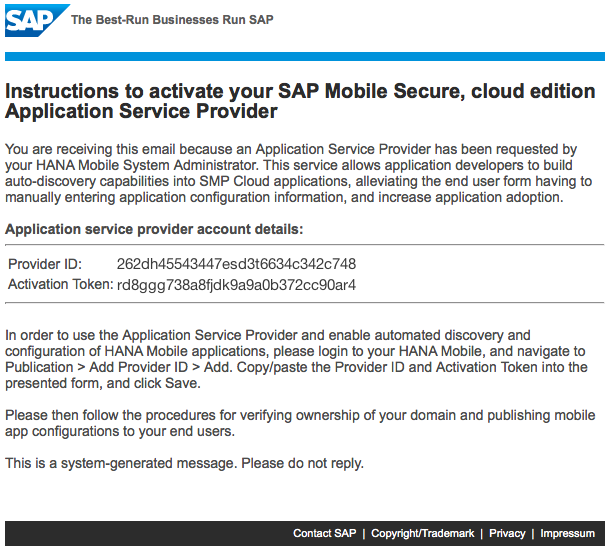
Register with SAP Mobile Secure, to obtain a Provider ID and Activation Token
You’ll receive a welcome email, containing your keys. This email is valid for 24 hours, so you should plan to complete the onboarding within that window.
-
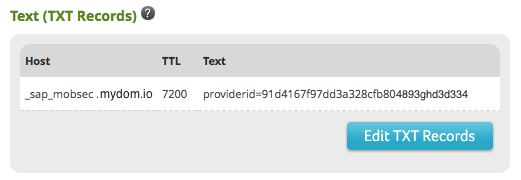
Add a TXT entry to your DNS records, containing your provider ID
In order to prove that you are the owner of the domains / subdomains for which you are publishing application configurations, we require that you add a text record to your DNS system. This indicates that you do indeed have Admin rights on these domains, and prevents impersonation during this onboarding sequence.
The procedure for editing TXT records on your DNS will vary from provider to provider, but the format of the record should be identical. I’ll share the steps for Network Solutions LLC, who hosts my domain, and for a personal developer setup, a simple GoDaddy domain would work similarly.
- In your account view, go to Advanced DNS Settings (Edit). Skip through the add-ons splash ads.
- Select Edit TXT Records
-
In the Add/Edit Text(TXT Records) - Currently Managing Domain :
form, add a new record with **Host** = `_sap_mobsec`, and **Text** = `providerid= ` 
This should result in a finished record like the following:
Next, pick the instructions for HANA Cloud Platform, Mobile Services (not yet released), or for the REST client (use the REST client, if you have SMP installed on-premise).
###With HANA Mobile
HANA Cloud Platform, Mobile Services is not yet released to customer. This information will be updated when it is generally available.
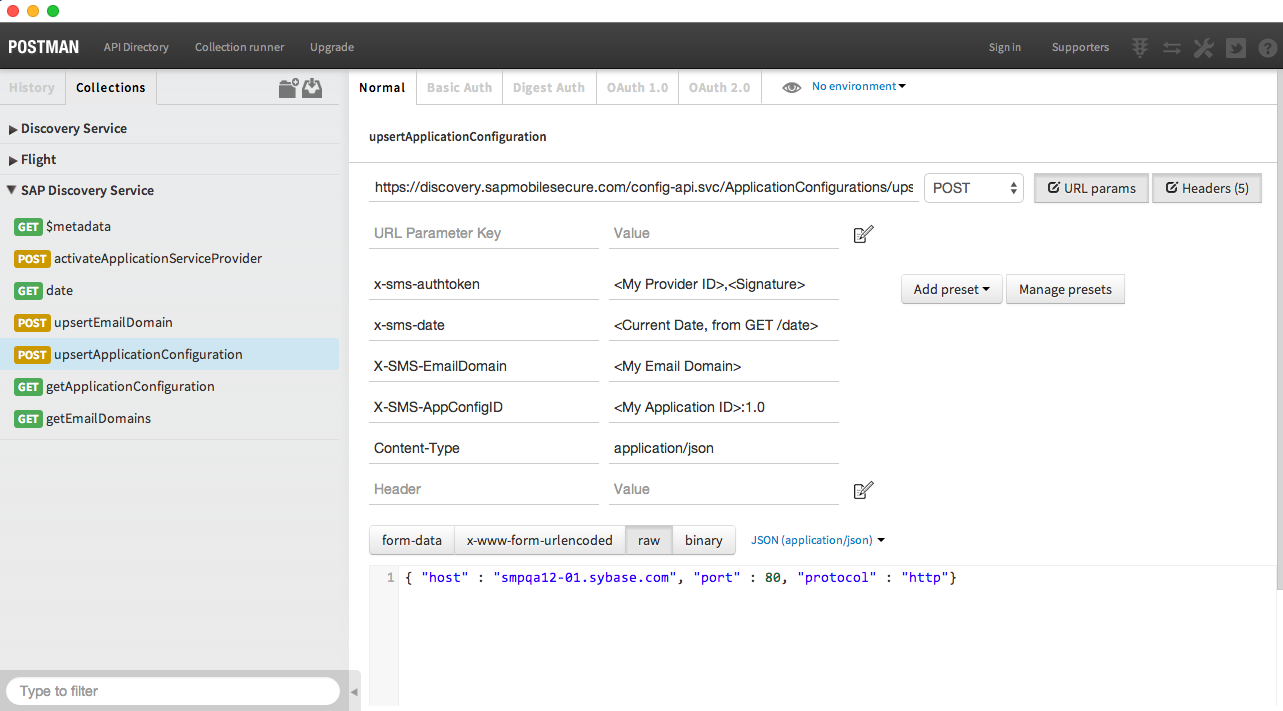
###With REST Client All services described here are available as a POSTMAN collection. POSTMAN is a free REST API tool available on the Chrome Web Store, with an optional native installer. To get the API collection, launch POSTMAN, and select Import Collection. Paste this URL in the form: https://www.getpostman.com/collections/51615332081eda73a86c, and you should then see a collection named SAP Discovery Service in your explorer.
####Activate your Provider ID and obtain a Secret Key
Select POST activateApplicationServiceProvider API. Insert your Provider ID in the designated query parameter, and add the ActivationToken in the POST body payload as a JSON key value
{
	"ActivationToken":"<My Activation Token>"
}
The response should include your Secret Key. Do NOT lose this key!
{
	"SecretKey":"<Secret Key Response>"
}
####Add an Email domain to your Provider account
Once your _sap_mobsec TXT record is deployed on your DNS, you can add the domain to your Provider account. This (and all REST calls from here on out) are a slightly more complicated procedure, that must be completed within 5 minutes of start. So, don’t worry if you timeout the first attempt; it will soon be easy.
- Download Signature.htm from Github.
- Edit the file, and paste your Provider ID and Secret Key into the prompted variable values
- In POSTMAN, execute
GET /date. Switch to the Response Headers tab, and copy the Date value (e.g.:Fri, 15 Aug 2014 23:03:16 GMT). -
Paste the Date value into the
timevariable in Signature.htm, and load the page. You should see a result like the following:Wed, 13 Aug 2014 17:40:28 GMT New Signature ProviderID=91d4167f97dd3a328cfb8098383920,Signature=lepHz71dMjqAeri322jfk39sjnl2zkM7eMOg+4l5uo= - In POSTMAN, select the
POST upsertEmailDomainservice. Paste the Date value into thex-sms-dateheader value, and the New Signature value into thex-sms-authtokenheader value -
Add a JSON object to your POST body, containing your ProviderID and EmailDomain
{"ProviderID":"<My Provider ID>", "EmailDomain":"<My Email Domain"}Execute Send.
If you succeed, you will get a response payload containing your email domain. If you fail, you’ll the appropriate error message, and you may retry. Some DNS providers have a waiting period for syncing the TXT records, so check to see that the _sap_mobsec TXT record is active. Save your request, so that your JSON body is retained. Repeat steps 3, 4, and 5, and re-send.
####Upsert an application configuration for your domain
Once your email domain is active on the Provider account, you can push up application configurations. Application configurations have the following minimum required payload:
{
    "host" : <host>,			//e.g. "sapwin-643.sap.com"
    "port" : <port>,			//e.g. 80
    "protocol" : <protocol>		//e.g. "http"
}
To upsert the application configuration, use POSTMAN to open POST upsertApplicationConfiguration. Paste the JSON payload of your configuration into the POST body. Then, follow steps 3-5 from POST upsertEmailDomain procedure to get the current Date, generate a Signature, and set the x-sms-date and x-sms-authtoken header values.
The new header values that you need to set are: X-SMS-EmailDomain = one of the email domains registered to your Provider ID, and X-SMS-AppConfigID = your application ID:version. This application ID matches the application ID in your SMP3 or HANA Mobile system, and in the application itself (e.g. in your Logon setup, you’ve invoked [self.logonManager setApplicationId:@"flight"];). The version value currently defaults to “1.0”, so you should concatenate “:1.0” to your application ID to construct this value.
Don’t attempt to add the version in your Application ID itself, as the client library will automatically append “1.0” anyway.
Once these are set, you can POST the service, and you should see
#####Authentication Types
######Basic Auth If you provide only these minimum connection settings, then the Logon client will assume that the authentication expects Basic auth, and will prompt end users for Basic credentials.
######Client Certificates
If deploying for use with Client Certificates, then you should add an Auth Type value to the payload. To instruct the client to invoke a <CertificateProvider> before attempting to register with the server (to obtain the certificate), expand the structure to include the following values:
{
    ...
    "protocol" : <protocol>,
    "auth" : [
        {
            "type" : certificate.sdkprovider
        }]
}
######SAML2 Identity Provider If deploying for use with SAML2 Identity Provider, you need to specify both that SAML is the auth type, as well as a set of configurations. These are discussed in more detail here.
{
    ...
    "protocol" : <protocol>,
    "auth" : [
        {
        "type" : saml2.web.post,
        "config" : {
            "saml2.web.post.authchallengeheader.name" :"com.sap.cloud.security.login",
            "saml2.web.post.finish.endpoint.uri" : "/SAMLAuthLauncher",
            "saml2.web.post.finish.endpoint.redirectparam" : "finishEndpointParam",
            }
        },
}